はじめに
こんにちはsuzukiです。本日はSwiftのMapViewのクラスタ機能について触れていこうと思います。 Clusterというライブラリでクラスタリングを行っていたのですが、iOSの11から標準のMapKitでクラスタリングが出来るようになりました。
クラスタリングとは
マップ上の複数のピンを一つにまとめることができます。こちらの機能を利用する事により、マップ上にピンが乱立していると分かりずらかった画面もわかりやすくする事ができます。
PINのクラスタリング機能を利用する
それでは実際にマップとピンを作成していきます。 今回マップはStoryBoardから実装します。
マップの作成

StoryBoardを利用すればMapViewの配置はとても簡単です。 PINの作成でDelegateの接続が必要になるので、忘れず設定しましょう。
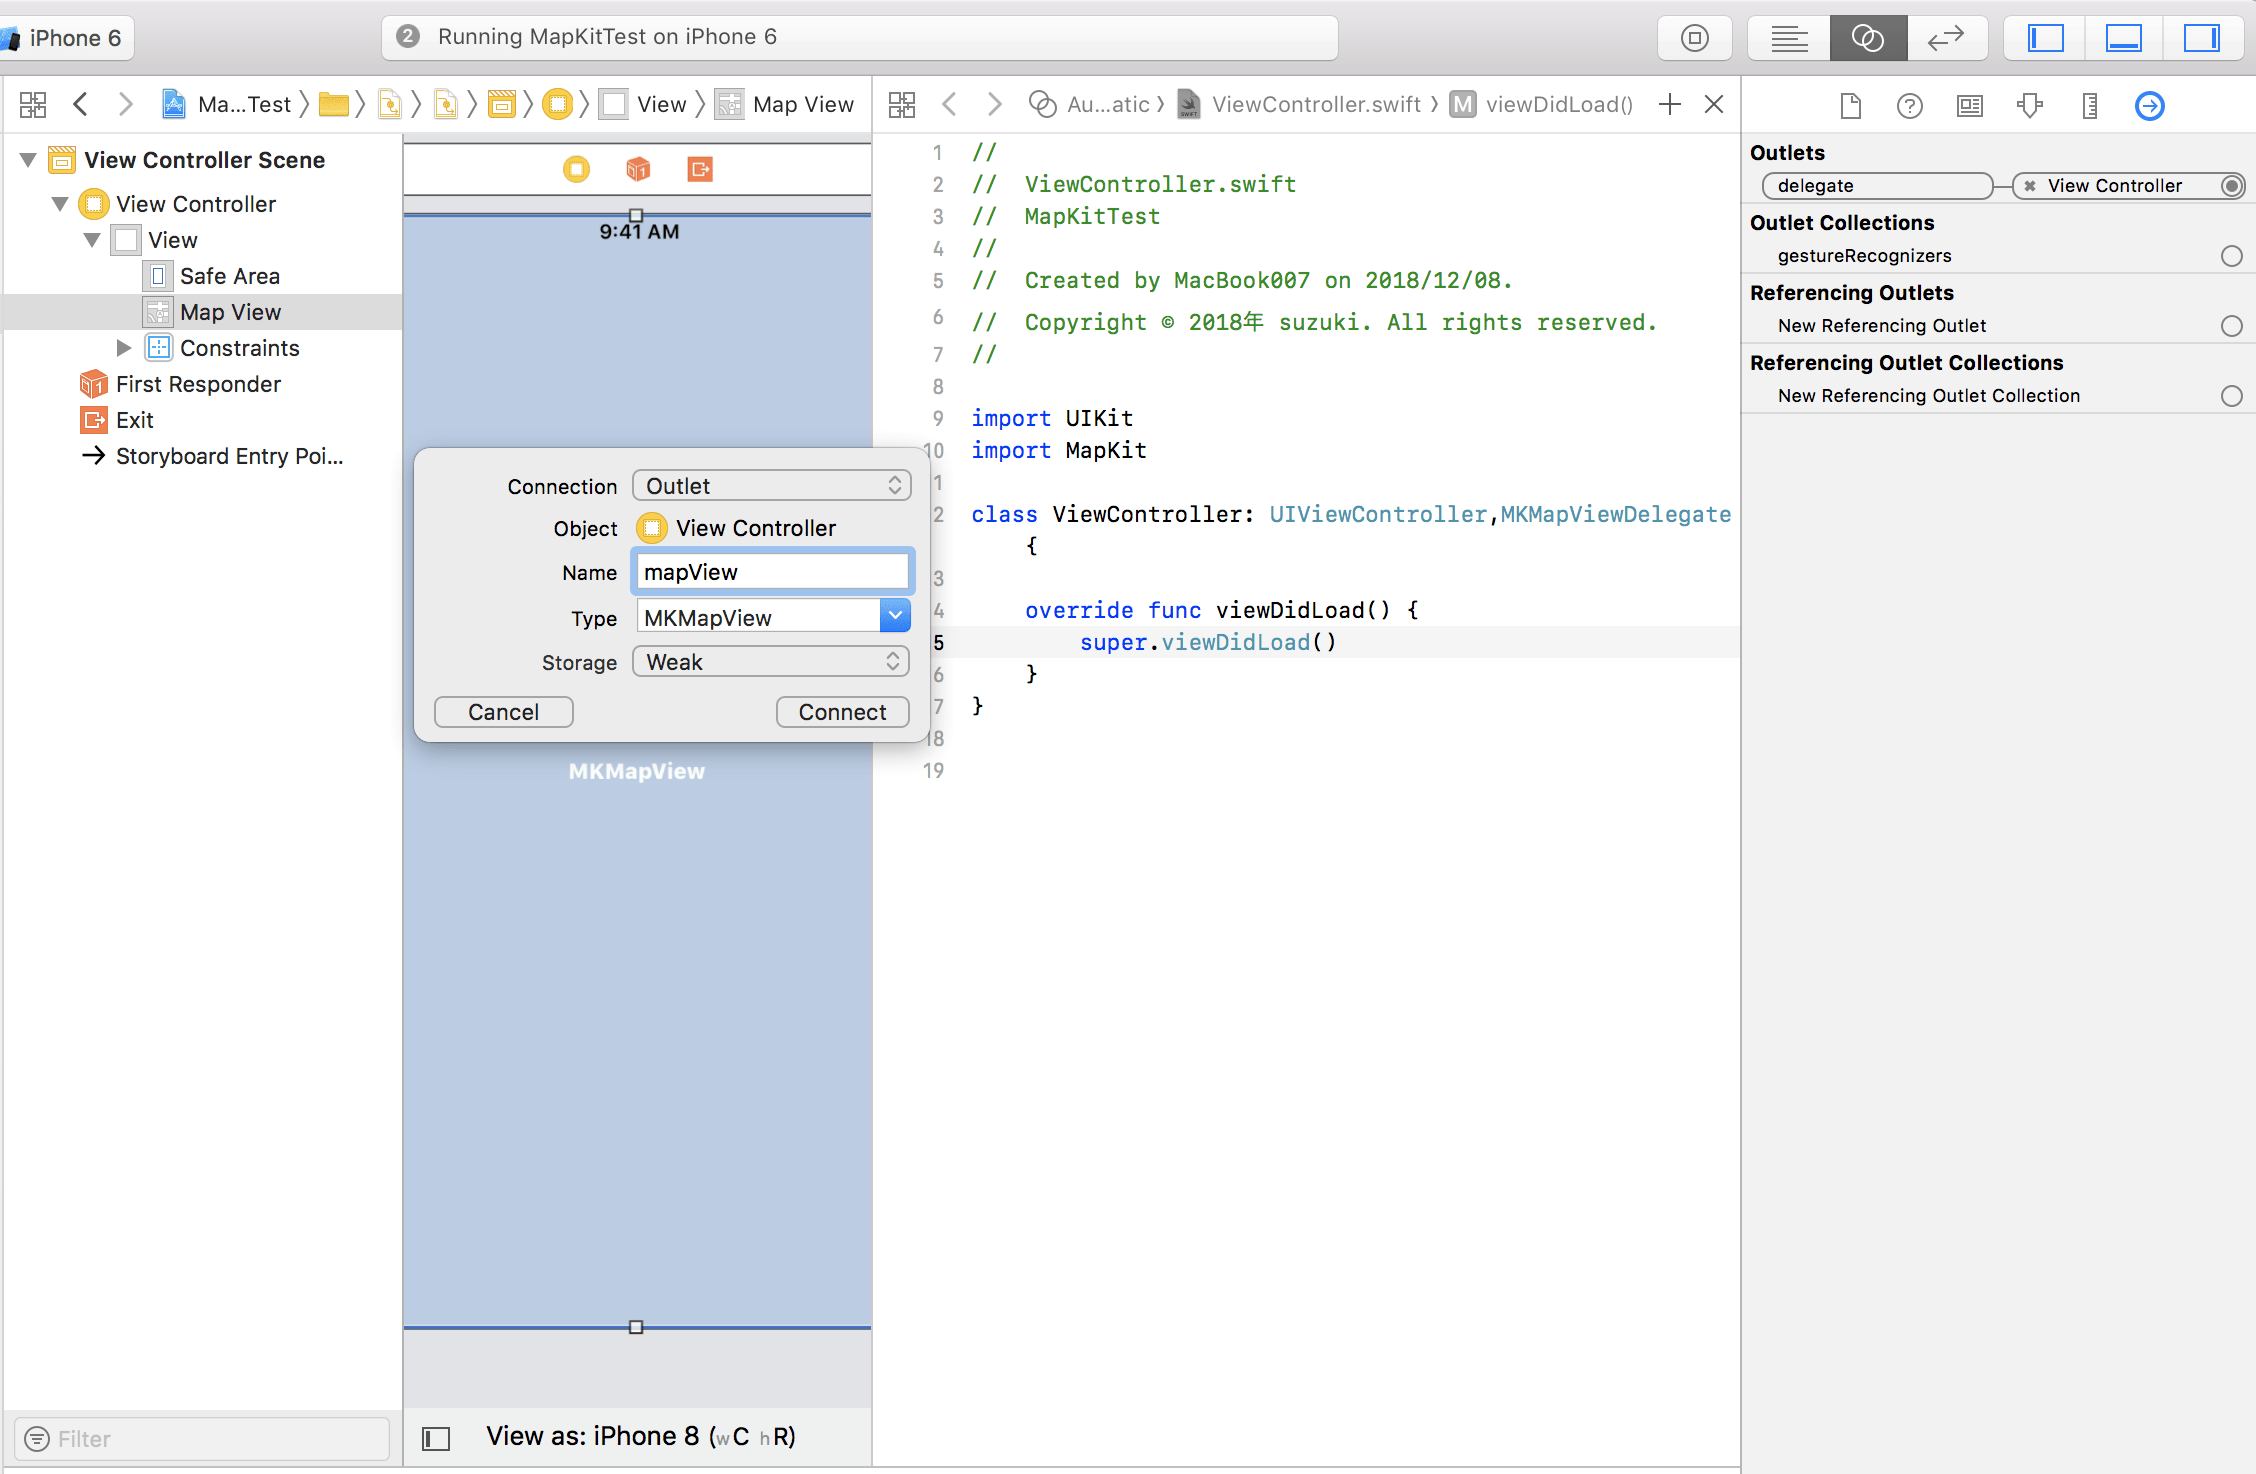
コードから配置したMapに対して指示を出したいのでOutlet接続して起きましょう。一度ビルドを行いMapが全画面で表示されていることを確認して下さい。
PINの作成
それではPINを作成していきます。下記のコードでPinをマップに追加できます。MKPointAnnotationをMapViewにaddAnnotationsで渡しています。
import UIKit
import MapKit
class ViewController: UIViewController,MKMapViewDelegate {
@IBOutlet weak var mapView: MKMapView!
override func viewDidLoad() {
super.viewDidLoad()
// Do any additional setup after loading the view, typically from a nib.
//Mapの中心座標設定
let centerCoordinate  = CLLocationCoordinate2D(latitude: 35.444374, longitude: 139.635466)
let span = MKCoordinateSpan(latitudeDelta: 0.2, longitudeDelta: 0.2)
let centerPosition = MKCoordinateRegion(center: centerCoordinate, span: span)
self.mapView.setRegion(centerPosition,animated:true)
//Pinの作成
let pin1 = MKPointAnnotation()
pin1.coordinate = CLLocationCoordinate2D(latitude: 35.44, longitude: 139.64)
pin1.title = "pin1"
let pin2 = MKPointAnnotation()
pin2.coordinate = CLLocationCoordinate2D(latitude: 35.45, longitude: 139.65)
pin2.title = "pin2"
let pin3 = MKPointAnnotation()
pin3.coordinate = CLLocationCoordinate2D(latitude: 35.46, longitude: 139.66)
pin3.title = "pin3"
//作成したPinをマップ上に追加
mapView.addAnnotations([pin1,pin2,pin3])
}
}
ここまで記述してアプリを起動するとPinがマップに追加されているのが確認出来るかと思います。しかしながら、Pinをまとめる機能は動作しておらず、最適な状態とは言えません。クラスタリングを行うためには少しコードを追加しましょう。またPinを装飾するためのカスタムクラスを作成します。
Pinのカスタマイズ
Pinのカスタムを行うためにカスタムクラスを作成します。iOS11から追加されたMKMarkerAnnotationViewを使いやすくするため下記のようなカスタムクラスを作成しました。
class CustomPinAnnotation: NSObject, MKAnnotation {
//ID
let clusteringIdentifier : String
//座標
let coordinate: CLLocationCoordinate2D
//Pinのテキスト
let glyphText: String
//Pinのテキストの文字色
let glyphTintColor: UIColor
//Pinの色
let markerTintColor: UIColor
init(_ identifier: String, coordinate: CLLocationCoordinate2D, glyphText: String, glyphTintColor: UIColor = .white, markerTintColor: UIColor) {
self.clusteringIdentifier = identifier
self.coordinate = coordinate
self.glyphText = glyphText
self.glyphTintColor = glyphTintColor
self.markerTintColor = markerTintColor
}
}
カスタムしたPinの利用
ViewDidLoadで記述したPinの追加コードをCustomPinAnnotationに変更します。
    override func viewDidLoad() {
super.viewDidLoad()
// Do any additional setup after loading the view, typically from a nib.
//Mapの中心座標設定
let centerCoordinate  = CLLocationCoordinate2D(latitude: 35.444374, longitude: 139.635466)
let span = MKCoordinateSpan(latitudeDelta: 0.2, longitudeDelta: 0.2)
let centerPosition = MKCoordinateRegion(center: centerCoordinate, span: span)
self.mapView.setRegion(centerPosition,animated:true)
//Pinの追加
let pin1 = CustomPinAnnotation("group1",coordinate: CLLocationCoordinate2D(latitude: 35.44, longitude: 139.64), glyphText: "pin1", glyphTintColor: .white, markerTintColor: .black)
let pin2 = CustomPinAnnotation("group1",coordinate: CLLocationCoordinate2D(latitude: 35.45, longitude: 139.65), glyphText: "pin2", glyphTintColor: .white, markerTintColor: .black)
let pin3 = CustomPinAnnotation("group3",coordinate: CLLocationCoordinate2D(latitude: 35.46, longitude: 139.66), glyphText: "pin3", glyphTintColor: .white, markerTintColor: .black)
mapView.addAnnotations([pin1,pin2,pin3])
}
これでカスタムしたPinクラスを使う準備ができました。
CustomPinからMKMarkerAnnotationViewに変換する
それでは最後にmapViewのdelegateでPin情報を取得して置き換えていきましょう。こちらのコードを書いてビルドすると同じclusteringIdentifierを設定しているPinがひとまとまりになっているのが確認できます。
    func mapView(_ mapView: MKMapView, viewFor annotation: MKAnnotation) -> MKAnnotationView? {
let annotationView = mapView.dequeueReusableAnnotationView(withIdentifier: MKMapViewDefaultAnnotationViewReuseIdentifier, for: annotation)
guard let markerAnnotationView = annotationView as? MKMarkerAnnotationView,
let annotation = annotation as? CustomPinAnnotation else {
return annotationView
}
markerAnnotationView.clusteringIdentifier = annotation.clusteringIdentifier
markerAnnotationView.glyphText = annotation.glyphText
markerAnnotationView.glyphTintColor = annotation.glyphTintColor
markerAnnotationView.markerTintColor = annotation.markerTintColor
return markerAnnotationView
}
こちらのコードでMap上のannotation(CustomPinAnnotation)からMKMarkerAnnotationViewを作成し返却します。個人的にMapKitのコードで解りづらい点として、delegateで渡されるannotationをダウンキャストして、情報を取得する点と、MKAnnotationViewのサブクラスを返却する点です。
- Pinの情報を持っているクラスは何か
- 最終的にMap上に配置したいオブジェクトは何か
上記を整理をしながら作成する必要があります。
修正版コード
念のためコードの全部記述いたします。
import UIKit
import MapKit
class ViewController: UIViewController,MKMapViewDelegate {
@IBOutlet weak var mapView: MKMapView!
override func viewDidLoad() {
super.viewDidLoad()
// Do any additional setup after loading the view, typically from a nib.
//Mapの中心座標設定
let centerCoordinate  = CLLocationCoordinate2D(latitude: 35.444374, longitude: 139.635466)
let span = MKCoordinateSpan(latitudeDelta: 0.2, longitudeDelta: 0.2)
let centerPosition = MKCoordinateRegion(center: centerCoordinate, span: span)
self.mapView.setRegion(centerPosition,animated:true)
//Pinの追加
let pin1 = CustomPinAnnotation("group1",coordinate: CLLocationCoordinate2D(latitude: 35.44, longitude: 139.64), glyphText: "pin1", glyphTintColor: .white, markerTintColor: .black)
let pin2 = CustomPinAnnotation("group1",coordinate: CLLocationCoordinate2D(latitude: 35.45, longitude: 139.65), glyphText: "pin2", glyphTintColor: .white, markerTintColor: .black)
let pin3 = CustomPinAnnotation("group3",coordinate: CLLocationCoordinate2D(latitude: 35.46, longitude: 139.66), glyphText: "pin3", glyphTintColor: .white, markerTintColor: .black)
mapView.addAnnotations([pin1,pin2,pin3])
}
func mapView(_ mapView: MKMapView, viewFor annotation: MKAnnotation) -> MKAnnotationView? {
let annotationView = mapView.dequeueReusableAnnotationView(withIdentifier: MKMapViewDefaultAnnotationViewReuseIdentifier, for: annotation)
guard let markerAnnotationView = annotationView as? MKMarkerAnnotationView,
let annotation = annotation as? CustomPinAnnotation else { return annotationView }
markerAnnotationView.clusteringIdentifier = annotation.clusteringIdentifier
markerAnnotationView.glyphText = annotation.glyphText
markerAnnotationView.glyphTintColor = annotation.glyphTintColor
markerAnnotationView.markerTintColor = annotation.markerTintColor
return markerAnnotationView
}
}
class CustomPinAnnotation: NSObject, MKAnnotation {
//ID
let clusteringIdentifier : String
//座標
let coordinate: CLLocationCoordinate2D
//Pinのテキスト
let glyphText: String
//Pinのテキストの文字色
let glyphTintColor: UIColor
//Pinの色
let markerTintColor: UIColor
init(_ identifier: String, coordinate: CLLocationCoordinate2D, glyphText: String, glyphTintColor: UIColor = .white, markerTintColor: UIColor) {
self.clusteringIdentifier = identifier
self.coordinate = coordinate
self.glyphText = glyphText
self.glyphTintColor = glyphTintColor
self.markerTintColor = markerTintColor
}
}
さいごに
最後までお付き合い頂き有難うございます。今回の機能は基本的にiOS11からの機能です。もしどうしてもiOS9とかが切れない場合、Clusterというライブラリを使うとPINのクラスタリングができます。以前に使った時は拡張や細かな変更もしやすく大変助かりました。