こんにちはsuzukiです。 今回は以前に紹介したクラスタ機能とテーブルビューを利用して、クラスタリングされたPINから、どのようなPINが含まれているかをリスト表示をしていこうと思います。 前回の記事はこちらを参照ください。
前回の記事からコードを少し変更しております。
import UIKit
import MapKit

class ViewController: UIViewController{
    @IBOutlet weak var mapView: MKMapView!
    override func viewDidLoad() {
        super.viewDidLoad()
        // Do any additional setup after loading the view, typically from a nib.
        //Mapの中心座標設定
        let centerCoordinate  = CLLocationCoordinate2D(latitude: 35.444374, longitude: 139.635466)
        let span = MKCoordinateSpan(latitudeDelta: 0.2, longitudeDelta: 0.2)
        let centerPosition = MKCoordinateRegion(center: centerCoordinate, span: span)
        self.mapView.setRegion(centerPosition,animated:true)
        //PINの追加
        let pin1 = CustomPinAnnotation("groupe1",coordinate: CLLocationCoordinate2D(latitude: 35.44, longitude: 139.64), glyphText: "pin1", glyphTintColor: .white, markerTintColor: .black)
        let pin2 = CustomPinAnnotation("groupe1",category:.busStop,coordinate: CLLocationCoordinate2D(latitude: 35.45, longitude: 139.65), glyphText: "pin2", glyphTintColor: .white, markerTintColor: .black)
        let pin3 = CustomPinAnnotation("groupe1",coordinate: CLLocationCoordinate2D(latitude: 35.46, longitude: 139.66), glyphText: "pin3", glyphTintColor: .white, markerTintColor: .black)
        //追加部分
        let pin4 = CustomPinAnnotation("groupe1",category:.station,coordinate: CLLocationCoordinate2D(latitude: 35.46, longitude: 139.67), glyphText: "pin4", glyphTintColor: .white, markerTintColor: .black)
        mapView.addAnnotations([pin1,pin2,pin3,pin4])

    }

}
//MapViewDelegate
extension ViewController:MKMapViewDelegate{
    func mapView(_ mapView: MKMapView, viewFor annotation: MKAnnotation) -> MKAnnotationView? {

        let annotationView = mapView.dequeueReusableAnnotationView(withIdentifier: MKMapViewDefaultAnnotationViewReuseIdentifier, for: annotation)

        guard let markerAnnotationView = annotationView as? MKMarkerAnnotationView,
            let annotation = annotation as? CustomPinAnnotation else { return annotationView }

        markerAnnotationView.clusteringIdentifier = annotation.clusteringIdentifier
        markerAnnotationView.glyphText = annotation.glyphText
        markerAnnotationView.glyphTintColor = annotation.glyphTintColor
        markerAnnotationView.markerTintColor = annotation.markerTintColor
        return markerAnnotationView
    }
}
// カテゴリーの追加
enum PinCategory {
    case station
    case busStop
    case none
}
//カスタムPINクラス
class CustomPinAnnotation: NSObject, MKAnnotation {
    //ID
    let clusteringIdentifier : String
    //カテゴリ
    let category: PinCategory
    //座標
    let coordinate: CLLocationCoordinate2D
    //PINのテキスト
    let glyphText: String
    //PINのテキストの文字色
    let glyphTintColor: UIColor
    //PINの色
    let markerTintColor: UIColor
    init(_ identifier: String,category:PinCategory = .none , coordinate: CLLocationCoordinate2D, glyphText: String, glyphTintColor: UIColor = .white, markerTintColor: UIColor) {
        self.clusteringIdentifier = identifier
        //カテゴリのInput
        self.category = category
        self.coordinate = coordinate
        self.glyphText = glyphText
        self.glyphTintColor = glyphTintColor
        self.markerTintColor = markerTintColor
    }
}
今回はPINの内容を取得するため、PINがタップされた時に呼ばれるデリゲートを使用します。
mapView(_ mapView: MKMapView, didSelect view: MKAnnotationView)
上記が呼ばれた時にクラスタリングされているPINか通常のPINか判別します。
クラスタリングされているPINの場合、MKClusterAnnotationにダウンキャストが行えます。
    func mapView(_ mapView: MKMapView, didSelect view: MKAnnotationView) {
        if let cluster = view.annotation as? MKClusterAnnotation {
            //クラスタリングされたPINを選択している
        }
    }
クラスタリングされているPINはMKClusterAnnotationのmemberAnnotationsから取得できます。
memberAnnotationsの型は[MKAnnotation]です。カスタマイズされたクラスの情報を取得したい場合はダウンキャストかmapで変換しましょう。
func mapView(_ mapView: MKMapView, didSelect view: MKAnnotationView) {
if let cluster = view.annotation as? MKClusterAnnotation {
//クラスタリングされたPINを選択している
guard let pinList = cluster.memberAnnotations as? [CustomPinAnnotation] else{
return
}
}
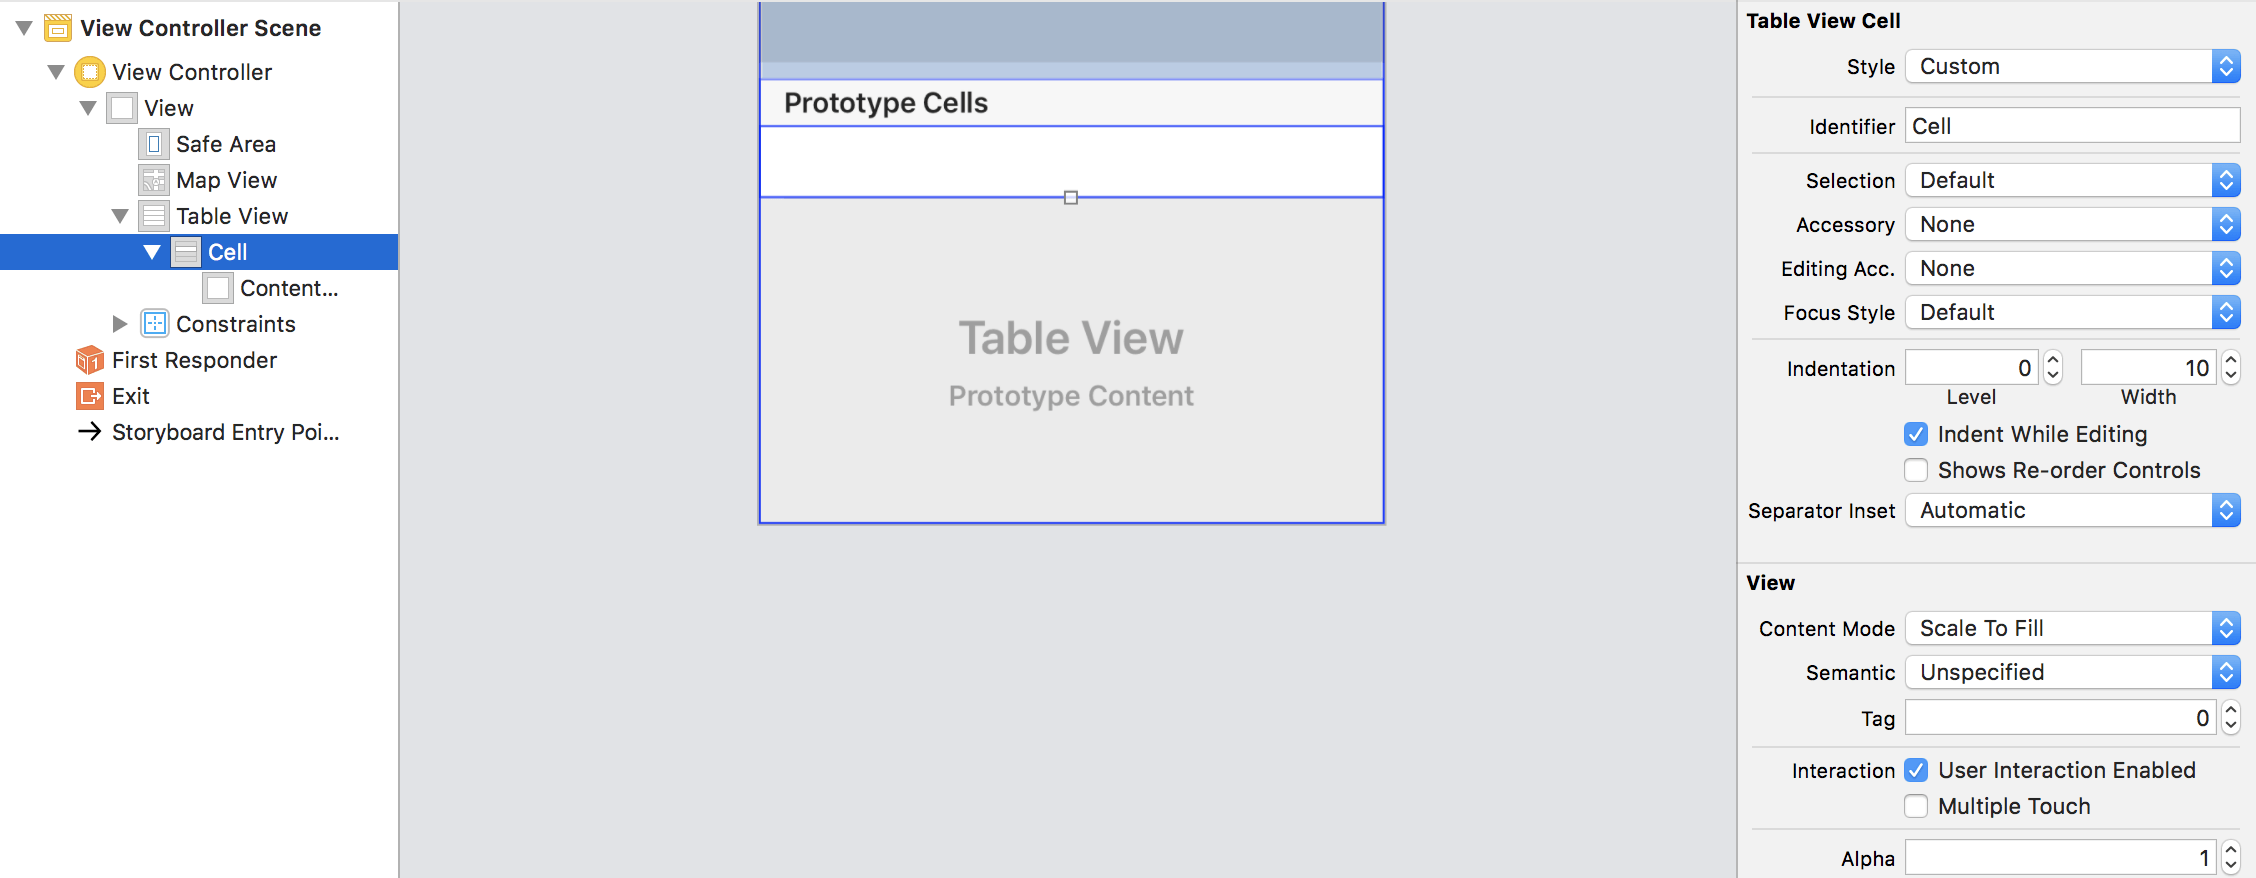
} こちらでクラスタリングされているPINの情報が取得できました。 ストーリーボードでTableViewを実装します。
PIN情報を受け取るためCustomPinAnnotationの配列を宣言します。
class ViewController: UIViewController{
    @IBOutlet weak var mapView: MKMapView!
    //tableViewのIBOutlet接続
    @IBOutlet weak var tableView: UITableView!
    //TableView表示のList
var selectedPinList:[CustomPinAnnotation] = [] selectedPinListが記述できたら、実際にPIN情報を渡してみましょう。 クラスタリングされているPINを取得するで作成したguard文の後ろにselectedPinList = pinListを追加します。 guard let pinList = cluster.memberAnnotations as? [CustomPinAnnotation] else{
return
}
//pinListを更新
selectedPinList = pinList
//次のTableView用のコードが実装できたら下のコードのコメントアウトを外してください。
//reload()
こちらは特に難しいことはないかと思うので今回実装した内容を簡単に記述いたします。
extension ViewController:UITableViewDelegate,UITableViewDataSource{

    func reload(){
        tableView.reloadData()
    }

    func tableView(_ tableView: UITableView, numberOfRowsInSection section: Int) -> Int {
        return self.selectedPinList.count
    }

    func tableView(_ tableView: UITableView, cellForRowAt indexPath: IndexPath) -> UITableViewCell {
        let cell = tableView.dequeueReusableCell(withIdentifier: "Cell", for: indexPath)
        cell.textLabel?.text = selectedPinList[indexPath.row].glyphText
        return cell
    }
    func tableView(_ tableView: UITableView, didSelectRowAt indexPath: IndexPath) {
        mapView.showAnnotations([selectedPinList[indexPath.row]], animated: true)
    }
} import UIKit
import MapKit
class ViewController: UIViewController{
@IBOutlet weak var mapView: MKMapView!
//tableViewのIBOutlet接続
@IBOutlet weak var tableView: UITableView!
//TableView表示のList
var selectedPinList:[CustomPinAnnotation] = []
override func viewDidLoad() {
super.viewDidLoad()
// Do any additional setup after loading the view, typically from a nib.
//Mapの中心座標設定
let centerCoordinate = CLLocationCoordinate2D(latitude: 35.444374, longitude: 139.635466)
let span = MKCoordinateSpan(latitudeDelta: 0.2, longitudeDelta: 0.2)
let centerPosition = MKCoordinateRegion(center: centerCoordinate, span: span)
self.mapView.setRegion(centerPosition,animated:true)
//PINの追加
let pin1 = CustomPinAnnotation("groupe1",coordinate: CLLocationCoordinate2D(latitude: 35.44, longitude: 139.64), glyphText: "pin1", glyphTintColor: .white, markerTintColor: .black)
let pin2 = CustomPinAnnotation("groupe1",category:.busStop,coordinate: CLLocationCoordinate2D(latitude: 35.45, longitude: 139.65), glyphText: "pin2", glyphTintColor: .white, markerTintColor: .black)
let pin3 = CustomPinAnnotation("groupe1",coordinate: CLLocationCoordinate2D(latitude: 35.46, longitude: 139.66), glyphText: "pin3", glyphTintColor: .white, markerTintColor: .black)
//追加部分
let pin4 = CustomPinAnnotation("groupe1",category:.station,coordinate: CLLocationCoordinate2D(latitude: 35.46, longitude: 139.67), glyphText: "pin4", glyphTintColor: .white, markerTintColor: .black)
mapView.addAnnotations([pin1,pin2,pin3,pin4])
//tableviewreload
reload()
}
}
//MapViewDelegate
extension ViewController:MKMapViewDelegate{
func mapView(_ mapView: MKMapView, viewFor annotation: MKAnnotation) -> MKAnnotationView? {
let annotationView = mapView.dequeueReusableAnnotationView(withIdentifier: MKMapViewDefaultAnnotationViewReuseIdentifier, for: annotation)
guard let markerAnnotationView = annotationView as? MKMarkerAnnotationView,
let annotation = annotation as? CustomPinAnnotation else { return annotationView }
markerAnnotationView.clusteringIdentifier = annotation.clusteringIdentifier
markerAnnotationView.glyphText = annotation.glyphText
markerAnnotationView.glyphTintColor = annotation.glyphTintColor
markerAnnotationView.markerTintColor = annotation.markerTintColor
return markerAnnotationView
}
func mapView(_ mapView: MKMapView, didSelect view: MKAnnotationView) {
if let cluster = view.annotation as? MKClusterAnnotation {
//クラスタリングされたPINを選択している
guard let pinList = cluster.memberAnnotations as? [CustomPinAnnotation] else{
return
}
//pinListを更新
selectedPinList = pinList
reload()
}
}
}
extension ViewController:UITableViewDelegate,UITableViewDataSource{
func reload(){
tableView.reloadData()
}
func tableView(_ tableView: UITableView, numberOfRowsInSection section: Int) -> Int {
return self.selectedPinList.count
}
func tableView(_ tableView: UITableView, cellForRowAt indexPath: IndexPath) -> UITableViewCell {
let cell = tableView.dequeueReusableCell(withIdentifier: "Cell", for: indexPath)
cell.textLabel?.text = selectedPinList[indexPath.row].glyphText
return cell
}
func tableView(_ tableView: UITableView, didSelectRowAt indexPath: IndexPath) {
mapView.showAnnotations([selectedPinList[indexPath.row]], animated: true)
}
}
// カテゴリーの追加
enum PinCategory {
case station
case busStop
case none
}
//カスタムPinクラス
class CustomPinAnnotation: NSObject, MKAnnotation {
//ID
let clusteringIdentifier : String
//カテゴリ
let category: PinCategory
//座標
let coordinate: CLLocationCoordinate2D
//PINのテキスト
let glyphText: String
//PINのテキストの文字色
let glyphTintColor: UIColor
//PINの色
let markerTintColor: UIColor
init(_ identifier: String,category:PinCategory = .none , coordinate: CLLocationCoordinate2D, glyphText: String, glyphTintColor: UIColor = .white, markerTintColor: UIColor) {
self.clusteringIdentifier = identifier
//カテゴリのInput
self.category = category
self.coordinate = coordinate
self.glyphText = glyphText
self.glyphTintColor = glyphTintColor
self.markerTintColor = markerTintColor
}
}
最後までありがとうございます。テーブルビューの表示非表示を切り替えたり、普通のピンをタップしたときの処理を追加したり等アプリとしてリリースする迄には実装したい内容はたくさんありますが、今回の記事はここまでとさせていただきます。また機会があれば内容を充実させて行きます。