Laravelの artisanコマンドは、実際にはバッチの開発などで使う機会が多いと思いますが、コンソール向きのコマンドも、Laravelから用意された機能を組み合わせることで、開発しやすくなっています。
今回は、 artisanコマンドを使用した、コンソール向きのコマンドの作成方法を紹介します。
コマンドを作成するには、下記コマンドを実行します。
$ php artisan make:command CommandName
app>Console>Commands配下に、コマンド用のクラスが作成されます。
コマンドを生成すると、以下のコードが生成されます。
<?php

namespace App\Console\Commands;

use Illuminate\Console\Command;

class HelloExample extends Command
{
    /**
     * The name and signature of the console command.
     *
     * @var string
     */    protected $signature = 'command:name';

    /**
     * The console command description.
     *
     * @var string
     */    protected $description = 'コマンドのサンプルです';

    /**
     * Create a new command instance.
     *
     * @return void
     */    public function __construct()
    {
        parent::__construct();
    }

    /**
     * Execute the console command.
     *
     * @return mixed
     */    public function handle()
    {
        //
    }
}
$signatureにコマンド名を指定します。実際にコマンドを実行する際は、 $ php artisan command:nameとなります。
また、 $descriptionには、コマンドの説明を書きます。ここに書いた説明は、 $ php artisan listコマンドを実行した時に表示されます。
__construct()メソッドは、主にコンストラクタインジェクションとして活用することができます。今回は説明を省略しますが、コマンドのロジックは、Service化しておくことで、取り回しの良いコードになると思います。handle()メソッドに、実際にコマンドが実行された時の処理を書きます。コマンドの引数やオプションも、このメソッド内で受け取ります。
以降、 handle()メソッド内での、コマンドの実装方法について、紹介したいと思います。
シンプルにコンソールに出力するには、以下のように実装します。
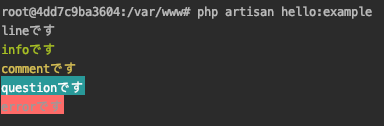
$this->line('こんにちは'); この他にも、出力したい内容別にメソッドが用意されており、それぞれ表示色が異なります。
状況に応じて、 info, comment,question,errorなども使い分けましょう。
表示色のサンプルです。
コマンドに引数を設定するには、 $signatureプロパティを次のようにします。
protected $signature = 'hello:example {first_name} {last_name}'; 引数を取得するには、handle()メソッドで、次のようにします。
    public function handle()
    {
        $firstName = $this->argument('first_name');
        $lastName = $this->argument('last_name');
        $this->line("$firstName $lastName");
    }
実際のコマンド実行は、次のようになります。
$ php artisan hello:example taro hoge
taro hoge
$signatureを次のようにすると、配列として引数を受け取ることができます。
protected $signature = 'hello:example {name*}'; オプションを指定し、値を取得するには、 $signatureプロパティを次のようにします。
protected $signature = 'hello:example {--firstname=} {--lastname=}'; オプションにデフォルト値を設定する場合は、上記の =に続けてデフォルト値を記載します。
また、bool値の取得であれば、 =は不要です。
オプションの値を取得するには、 handle()ソメッドで、次のようにします。
    public function handle()
    {
        $firstName = $this->option('firstname');
        $lastName = $this->option('lastname');
        $this->line("$firstName $lastName");
    }
実際のコマンド実行は次のようになります。
$ php artisan hello:example --firstname=taro --lastname=hoge
taro hoge
対話型のコマンドを作成することも可能です。
ユーザに入力を要求することができます。
$name = $this->ask('名前を入力してください。');
$this->line('こんにちは'.$name.'さん');
実行結果は次のようになります。
$ php artisan hello:example

 名前を入力してください。:
 > Taro

こんにちはTaroさん
ask()と似ていますが、入力内容がコンソールに表示されません。
$name = $this->secret('パスワードを入力してください。'); Y/Nで確認を取りたい時に使用します。
    public function handle()
    {
        if ($this->confirm('これでよろしいですか?')) {
            // yが入力された時
            $this->line('完了しました');
        }
    }
実行結果は次のようになります。
$ php artisan hello:example

 これでよろしいですか? (yes/no) [no]:
 > yes

完了しました
時間のかかる処理を実行するときは、プログレスバーで進捗を表示することができます。
    public function handle()
    {
        $bar = $this->output->createProgressBar(10);
        $bar->start();

        for ($i = 0; $i < 10; $i++) {
            sleep(1);
            $bar->advance(); // 進捗を進める
        }

        $bar->finish();
        echo PHP_EOL; // 改行
        $this->info('完了しました');

    }
注意点としては、プログレスバーの後は改行されないため、 echo PHP_EOLで改行コードを出力する必要があります。
実行結果は次のようになります。
$ php artisan hello:example
 10/10 [▓▓▓▓▓▓▓▓▓▓▓▓▓▓▓▓▓▓▓▓▓▓▓▓▓▓▓▓] 100%
完了しました
テーブルを出力できることも可能です。例えば、DBのレコードを一覧表示する時に使用できます。
    public function handle()
    {
        $headers = ['id','名前', '著者'];
        $books = Book::all(['id','title', 'author'])->toArray();
        $this->table($headers, $books);
    }
実行結果は次のようになります。
$ php artisan hello:example
+----+-------------+----------+
| id | 名前        | 著者     |
+----+-------------+----------+
| 1  | Laravel入門 | Lara太郎 |
| 3  | PHP入門     | PHP太郎  |
+----+-------------+----------+
「国立図書館デジタルコレクション書誌情報」をダウンロードし、テーブルに格納するコマンドのサンプルコードです。
ダウンロードにはGuzzleHttp、ExcelデータのインポートにはLaravel Excelを使用しています。
BooksImport.php
<?php

namespace App\Imports;

use App\Book;
use Maatwebsite\Excel\Concerns\Importable;
use Maatwebsite\Excel\Concerns\ToModel;
use Maatwebsite\Excel\Concerns\WithHeadingRow;
use Maatwebsite\Excel\Concerns\WithProgressBar;

class BooksImport implements ToModel, WithProgressBar
{
    use Importable;
    /**
    * @param array $row
    *
    * @return \Illuminate\Database\Eloquent\Model|null
    */    public function model(array $row)
    {
        if ($row[0] === 'URL') {
            return null;
        }

        $book = new Book();
        $book->title = $row[1].' '.$row[2];
        $book->author = $row[5];
        $book->description = $row[15];

        return $book;
    }
}
ImportBooks.php
<?php

namespace App\Console\Commands;

use App\Imports\BooksImport;
use GuzzleHttp\Client;
use Illuminate\Console\Command;
use Illuminate\Support\Facades\Storage;

class ImportBooks extends Command
{
    /**
     * The name and signature of the console command.
     *
     * @var string
     */    protected $signature = 'import:books';

    /**
     * The console command description.
     *
     * @var string
     */    protected $description = 'Command description';

    /**
     * Create a new command instance.
     *
     * @return void
     */    public function __construct()
    {
        parent::__construct();
    }

    /**
     * Execute the console command.
     *
     * @return mixed
     */    public function handle()
    {
        if (!$this->confirm('図書データを新規追加します。よろしいですか?')) {
            return;
        }

        $this->line('ダウンロードしています。');
        $bar = $this->output->createProgressBar(); // ダウンロードファイルサイズは後から取得するため、初期値は設定しない。
        $bar->start();

        $client = new Client();
        $path = Storage::path('books.xlsx');
        $client->request(
            'GET',
            'https://dl.ndl.go.jp/files/dataset/dataset_202001_t_kannai.xlsx',
            [
                'sink' => $path,
                'progress' => function($downloadTotal, $downloadedBytes, $uploadTotal, $uploadedBytes) use ($bar) {
                    $bar->setMaxSteps($downloadTotal); // ダウンロードサイズ
                    $bar->setProgress($downloadedBytes); // ダウンロード済みサイズ
                }
                ]);

        $bar->finish();

        echo PHP_EOL;
        $this->info('ダウンロード完了');
        $this->line('インポートしています。');

        // Laravel ExcelのwithOutput()メソッドを使用すると、コンソールにプログレスを表示することができる。
        (new BooksImport())->withOutput($this->output)->import($path);
        $this->info(' インポート完了');
    }
}
$ php artisan import:booksコマンドで実行できます。
いかがでしたか。 artisanコマンドは、よくコンソールで使用される機能が揃っているので、ちょっとした手作業を自動化する際に、使い勝手が良さそうですね。