はじめに
今回はFlutterでカメラのフレームデータを取得して、リアルタイムで画像認識を行いたいと思います。
準備
まずはパッケージのcameraをpubspec.yamlに追加しましょう。
| 1 | flutter pub add camera |
pubspec.yamlに追加されていれば成功です。
| 1 | camera: ^0.10.0+1 |
次は、iOSでカメラを使用するために、Info.plistに以下の内容を追加します。
cameraパッケージでは動画も扱える関係で、カメラとマイク二つの許可が必要になります。
| 1 2 3 4 | <key>NSCameraUsageDescription</key> <string>カメラ使います</string> <key>NSMicrophoneUsageDescription</key> <string>マイクを使います</string> |
また、cameraパッケージの動作環境は、iOSでは10以上、Androidは21以上になっています。それ以下のバージョンでは動作しません。
そうしたら次は、画像認識のためにgoogle_ml_kitパッケージを追加します。
| 1 | flutter pub add google_ml_kit |
こちらも、pubspec.yamlに追加されていれば成功です。
| 1 | google_ml_kit: ^0.12.0 |
最後にカメラから取得した画像をgoogle_ml_kitに渡す際に
画像の回転処理などをスムーズに行うためにimageパッケージを追加します。
| 1 | flutter pub add image |
こちらも、pubspec.yamlに追加されていれば成功です。
| 1 | image: ^3.2.0 |
実装
カメラプレビューの作成
最初に、カメラのプレビューをアプリで表示したいと思います。
まずは、デバイスで使用できるカメラの一覧を取得します。
| 1 2 3 4 5 6 7 8 9 10 11 12 | import 'package:camera/camera.dart'; import 'package:flutter/material.dart'; late List<CameraDescription> _cameras; Future<void> main() async { WidgetsFlutterBinding.ensureInitialized(); // 使用できるカメラの一覧取得 _cameras = await availableCameras(); runApp(const CameraApp()); } |
CameraDescriptionの中身は以下のようになっており、バックカメラやフロントカメラを取得することができます。
| 1 | CameraDescription(com.apple.avfoundation.avcapturedevice.built-in_video:0, CameraLensDirection.back, 90) |
次にカメラを制御するためのCameraControllerを作成します。
| 1 2 3 4 5 6 7 8 9 10 11 12 13 14 15 16 17 18 19 20 21 22 23 24 25 26 27 28 29 30 31 32 33 | class CameraApp extends StatefulWidget { /// Default Constructor const CameraApp({Key? key}) : super(key: key); @override State<CameraApp> createState() => _CameraAppState(); } class _CameraAppState extends State<CameraApp> { late CameraController controller; @override void initState() { super.initState(); controller = CameraController(_cameras[0], ResolutionPreset.max); controller.initialize().then((_) { if (!mounted) { return; } setState(() {}); }).catchError((Object e) { if (e is CameraException) { switch (e.code) { case 'CameraAccessDenied': print('User denied camera access.'); break; default: print('Handle other errors.'); break; } } }); } |
CameraControllerの第一引数に最初に取得したCameraDescriptionを、第二引数に解像度の指定を入れます。ResolutionPreset.maxを指定することで使用できる最大の解像度を設定してくれます。CameraControllerを生成したらinitializeを行い、CameraControllerの準備は完了です。
| 1 2 3 4 5 6 7 8 9 | @override Widget build(BuildContext context) { if (!controller.value.isInitialized) { return Container(); } return MaterialApp( home: CameraPreview(controller), ); } |
最後にCameraPreviewにCameraControllerをセットすれば、カメラのプレビュー表示は完了です。
またカメラプレビューやカメラを使っての写真撮影は過去記事をご確認ください。
プレビューからフレームデータ取得
次はプレビューからフレームデータを取得したいと思います。プレビューの初期化が完了している状態なら、CameraControllerのstartImageStreamを使用することでプレビュー画像の更新を受け取ることができます。
| 1 2 3 4 5 | void _start() { _controller?.startImageStream(_processImage); } void _processImage(CameraImage cameraImage) async { |
フレームデータから画像認識
それでは早速、_processImageで画像認識をおこないと思います。サンプルでは文字認識をおこないます、以下はサンプルソースです。
| 1 2 3 4 5 6 7 8 9 10 11 12 13 14 15 16 17 18 19 20 21 22 23 24 25 26 27 28 29 30 31 32 33 34 35 36 37 38 39 40 41 42 43 44 45 46 47 48 49 50 51 52 53 54 55 56 57 58 59 60 61 62 63 64 65 66 67 68 69 70 71 72 73 74 75 76 77 78 79 80 81 82 83 84 85 86 | final textRecognizer = TextRecognizer(script: TextRecognitionScript.latin); bool _isDetecting = false; Size? _imageSize; List<TextElement> _elements = []; void _processImage(CameraImage cameraImage) async { if (!_isDetecting && mounted) { _isDetecting = true; // CameraImageからInputImageを作成する final WriteBuffer allBytes = WriteBuffer(); for (final Plane plane in cameraImage.planes) { allBytes.putUint8List(plane.bytes); } final bytes = allBytes.done().buffer.asUint8List(); final Size imageSize = Size(cameraImage.width.toDouble(), cameraImage.height.toDouble()); final InputImageRotation imageRotation = _rotationIntToImageRotation(widget.camera.sensorOrientation); final InputImageFormat inputImageFormat = InputImageFormatValue.fromRawValue(cameraImage.format.raw) ?? InputImageFormat.nv21; final planeData = cameraImage.planes.map( (Plane plane) { return InputImagePlaneMetadata( bytesPerRow: plane.bytesPerRow, height: plane.height, width: plane.width, ); }, ).toList(); final inputImageData = InputImageData( size: imageSize, imageRotation: imageRotation, inputImageFormat: inputImageFormat, planeData: planeData, ); final inputImage = InputImage.fromBytes(bytes: bytes, inputImageData: inputImageData); try {// 画像認識開始 final RecognizedText recognizedText = await textRecognizer.processImage(inputImage); List<TextElement> _detectedElements = []; for (TextBlock block in recognizedText.blocks) { print('block: ${block.text}'); for (TextLine line in block.lines) { print('text: ${line.text}'); for (TextElement element in line.elements) { print('text: ${element.text}'); _detectedElements.add(element); } } } setState(() { // 画像認識したサイズを保持 _imageSize = Size(cameraImage.height.toDouble(), cameraImage.width.toDouble()); // 画像認識で取得したtextとrectを保持 _elements = _detectedElements; }); // 250msスリープさせて負荷を下げる await Future.delayed(Duration(milliseconds: 250)); } catch (ex, stack) { debugPrint('$ex, $stack'); } _isDetecting = false; } } // カメラの回転をInputImageRotationで返却する InputImageRotation _rotationIntToImageRotation(int rotation) { switch(rotation) { case 0: return InputImageRotation.rotation0deg; case 90: return InputImageRotation.rotation90deg; case 180: return InputImageRotation.rotation180deg; case 270: return InputImageRotation.rotation270deg; } return InputImageRotation.rotation0deg; } |
まずは取得したCameraImageを画像認識で使用するInputImageに変換します。CameraImageからInputImageへの変換はgoogle_mlkit_commonsで載せられているソースをほぼそのまま使用しています。具体的には以下の箇所になります。
| 1 2 3 4 5 6 7 8 9 10 11 12 13 14 15 16 17 18 19 20 21 22 23 24 25 26 27 28 29 30 31 32 33 34 | // CameraImageからInputImageを作成する final WriteBuffer allBytes = WriteBuffer(); for (final Plane plane in cameraImage.planes) { allBytes.putUint8List(plane.bytes); } final bytes = allBytes.done().buffer.asUint8List(); final Size imageSize = Size(cameraImage.width.toDouble(), cameraImage.height.toDouble()); final InputImageRotation imageRotation = _rotationIntToImageRotation(widget.camera.sensorOrientation); final InputImageFormat inputImageFormat = InputImageFormatValue.fromRawValue(cameraImage.format.raw) ?? InputImageFormat.nv21; final planeData = cameraImage.planes.map( (Plane plane) { return InputImagePlaneMetadata( bytesPerRow: plane.bytesPerRow, height: plane.height, width: plane.width, ); }, ).toList(); final inputImageData = InputImageData( size: imageSize, imageRotation: imageRotation, inputImageFormat: inputImageFormat, planeData: planeData, ); final inputImage = InputImage.fromBytes(bytes: bytes, inputImageData: inputImageData); |
InputImageを作成したらTextRecognizerを使用して画像認識をおこないます。
| 1 2 3 4 5 6 7 8 9 10 11 12 13 | try {// 画像認証開始 final RecognizedText recognizedText = await textRecognizer.processImage(inputImage); List<TextElement> _detectedElements = []; for (TextBlock block in recognizedText.blocks) { print('block: ${block.text}'); for (TextLine line in block.lines) { print('text: ${line.text}'); for (TextElement element in line.elements) { print('text: ${element.text}'); _detectedElements.add(element); } } } |
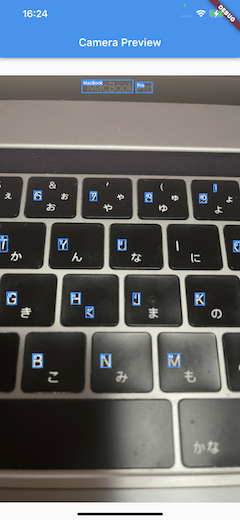
画像認識を行なったらRecognizedTextに結果が返ってくるのでそれを取得します。上記で取得しているTextBlockには複数行含む、文字認識では最大構成の文字データ、TextLineは1行の文字データ、TextElementは認識した文字の最小構成のデータになっています、TextElementは1文字のみのデータというわけではなく、スペースなどを考慮してmlkitが判断した最小構成になります。
例えば「MackBook Pro」というロゴを認識した際はTextBlockとTextLineでは「MackBook Pro」ですが、TextElementでは「MackBook」「Pro」という構成になります。
| 1 2 3 4 5 6 | setState(() { // 画像認識したサイズを保持 _imageSize = Size(cameraImage.height.toDouble(), cameraImage.width.toDouble()); // 画像認識で取得したtextとrectを保持 _elements = _detectedElements; }); |
上記部分に関しては次の項目で画像認識した箇所に枠線を表示するための準備なので、文字認識だけ認識だけ行いたいという方はスルーして大丈夫です。
画像認識した箇所に枠線の表示
CustomPaintを使用してカメラプレビューの上に文字認識を表示したいと思います。CustomPaintについては過去記事をご確認ください。まずはカメラプレビューをCustomPaintのchildにして、foregroundで枠線を書いていきたいと思います。
| 1 2 3 4 5 6 7 8 9 | Center( child: CustomPaint( foregroundPainter: TextDetectorPainter( _imageSize!, _elements, ), child: CameraPreview(_controller!), ), ), |
_imageSizeと_elementsひとつ前の項目のサンプルソースで保持していますので、ご確認ください。
描画処理自体は単純で、保持したTextElement情報をもとに、認識した文字と位置を表示しているだけです。
気をつける箇所は、画像認識で使用しているカメラの解像度とCanvasのサイズが異なるので、_imageSizeで保持しているカメラの解像度に基づいてscale処理を行うようにしています。
| 1 2 3 4 5 6 7 8 9 10 11 12 13 14 15 16 17 18 19 20 21 22 23 24 25 26 27 28 29 30 31 32 33 34 35 36 37 38 39 40 41 42 43 44 45 46 47 48 49 50 51 52 53 54 55 56 57 58 59 | class TextDetectorPainter extends CustomPainter { TextDetectorPainter(this.absoluteImageSize, this.elements); final Size absoluteImageSize; final List<TextElement> elements; final TextPainter painter = TextPainter( textDirection: TextDirection.ltr, ); @override void paint(Canvas canvas, Size size) { // 画像認識した画像のサイズと実際に描画されるCanvasのサイズが違うためscaleをかける final double scaleX = size.width / absoluteImageSize.height; final double scaleY = size.height / absoluteImageSize.width; Rect _scaleRect(TextElement container) { return Rect.fromLTRB( container.boundingBox.left * scaleX, container.boundingBox.top * scaleY, container.boundingBox.right * scaleX, container.boundingBox.bottom * scaleY, ); } void _drawText(TextElement element) { // 認識した文字の描画 painter.text = TextSpan( text: element.text, style: TextStyle( color: Colors.white, backgroundColor: Colors.blue, fontSize: 8.0, ), ); Offset position = Offset( element.boundingBox.left * scaleX + 2.0, element.boundingBox.top * scaleY, ); painter.layout(); painter.paint(canvas, position); } // 枠線の描画 final Paint paint = Paint() ..style = PaintingStyle.stroke ..color = Colors.blue ..strokeWidth = 2.0; for (TextElement element in elements) { canvas.drawRect(_scaleRect(element), paint); _drawText(element); } } @override bool shouldRepaint(TextDetectorPainter oldDelegate) { return true; } } |
さいごに
mlkitで出来ることはいっぱいありそうなので、色々遊んでみたいです。次は顔認識でもやってみようかと思います。


