はじめに
こんにちは、matsunariです。
今回はGoogleCodeLabsでCameraXの実装を行いました。以前の記事でJavaでPreviewを実装しましたが今回はkotlinでイメージキャプチャまで行います。
GoogleCodeLabsでのチュートリアルがありますが、英語で説明も少ないので今回少し詳しく書いてみます。
概要
今回実装を行ったMainActivityのソースコードを先に載せておきます。
| 1 2 3 4 5 6 7 8 9 10 11 12 13 14 15 16 17 18 19 20 21 22 23 24 25 26 27 28 29 30 31 32 33 34 35 36 37 38 39 40 41 42 43 44 45 46 47 48 49 50 51 52 53 54 55 56 57 58 59 60 61 62 63 64 65 66 67 68 69 70 71 72 73 74 75 76 77 78 79 80 81 82 83 84 85 86 87 88 89 90 91 92 93 94 95 96 97 98 99 100 101 102 103 104 105 106 107 108 109 110 111 112 113 114 115 116 117 118 119 120 121 122 123 124 125 126 127 128 129 130 131 132 133 134 135 136 137 138 139 | package com.example.mycameraxapp //CameraXに必要となるインポートです import android.Manifest import android.content.pm.PackageManager import android.graphics.Matrix import android.os.Bundle import android.util.Log import android.util.Size import android.view.Surface import android.view.TextureView import android.view.ViewGroup import android.widget.ImageButton import android.widget.Toast import androidx.appcompat.app.AppCompatActivity import androidx.camera.core.* import androidx.core.app.ActivityCompat import androidx.core.content.ContextCompat import java.io.File import java.util.concurrent.Executors private const val REQUEST_CODE_PERMISSIONS = 10 private val REQUIRED_PERMISSIONS = arrayOf(Manifest.permission.CAMERA,Manifest.permission.WRITE_EXTERNAL_STORAGE) class MainActivity : AppCompatActivity() { override fun onCreate(savedInstanceState: Bundle?) { super.onCreate(savedInstanceState) setContentView(R.layout.activity_main) viewFinder = findViewById(R.id.view_finder) if (allPermissionsGranted()) { viewFinder.post { startCamera() } } else { ActivityCompat.requestPermissions( this, REQUIRED_PERMISSIONS, REQUEST_CODE_PERMISSIONS) } } //カメラ撮影時に利用する単一のスレッドを取得し再利用できるようにexecutorを作成します。 private val executor = Executors.newSingleThreadExecutor() //後に利用するTextureViewをここで定義します。 private lateinit var viewFinder: TextureView private fun startCamera() { val previewConfig = PreviewConfig.Builder().apply { setTargetResolution(Size(640, 480)) }.build() val preview = Preview(previewConfig) preview.setOnPreviewOutputUpdateListener { val parent = viewFinder.parent as ViewGroup parent.removeView(viewFinder) parent.addView(viewFinder, 0) viewFinder.surfaceTexture = it.surfaceTexture updateTransform() } val imageCaptureConfig = ImageCaptureConfig.Builder() .apply { setCaptureMode(ImageCapture.CaptureMode.MIN_LATENCY) }.build() val imageCapture = ImageCapture(imageCaptureConfig) findViewById(R.id.capture_button).setOnClickListener { val file = File(externalMediaDirs.first(), "${System.currentTimeMillis()}.jpg") imageCapture.takePicture(file, executor, object : ImageCapture.OnImageSavedListener { override fun onError( imageCaptureError: ImageCapture.ImageCaptureError, message: String, exc: Throwable? ) { val msg = "Photo capture failed: $message" Log.e("CameraXApp", msg, exc) viewFinder.post { Toast.makeText(baseContext, msg, Toast.LENGTH_SHORT).show() } } override fun onImageSaved(file: File) { val msg = "Photo capture succeeded: ${file.absolutePath}" Log.d("CameraXApp", msg) viewFinder.post { Toast.makeText(baseContext, msg, Toast.LENGTH_SHORT).show() } } }) } CameraX.bindToLifecycle(this, preview, imageCapture) } private fun updateTransform() { val matrix = Matrix() val centerX = viewFinder.width / 2f val centerY = viewFinder.height / 2f val rotationDegrees = when(viewFinder.display.rotation) { Surface.ROTATION_0 ->; 0 Surface.ROTATION_90 -> 90 Surface.ROTATION_180 -> 180 Surface.ROTATION_270 -> 270 else -> return } matrix.postRotate(-rotationDegrees.toFloat(), centerX, centerY) viewFinder.setTransform(matrix) } override fun onRequestPermissionsResult( requestCode: Int, permissions: Array, grantResults: IntArray) { if (requestCode == REQUEST_CODE_PERMISSIONS) { if (allPermissionsGranted()) { viewFinder.post { startCamera() } } else { Toast.makeText(this, "Permissions not granted by the user.", Toast.LENGTH_SHORT).show() finish() } } } //マニフェストで指定されたすべての権限が付与されているかどうかを確認します private fun allPermissionsGranted() = REQUIRED_PERMISSIONS.all { ContextCompat.checkSelfPermission( baseContext, it) == PackageManager.PERMISSION_GRANTED } } |
使用前の準備
CameraXを使用する為に依存関係の設定と権限の設定が必要です。
build.gradleの依存関係(dependenciesの中)にCameraXのライブラリを追加します。
| 1 2 3 4 5 6 7 8 9 10 11 12 13 14 15 16 | dependencies { implementation fileTree(dir: 'libs', include: ['*.jar']) implementation"org.jetbrains.kotlin:kotlin-stdlib-jdk7:$kotlin_version" implementation 'androidx.appcompat:appcompat:1.0.2' implementation 'androidx.core:core-ktx:1.0.2' implementation 'androidx.constraintlayout:constraintlayout:1.1.3' testImplementation 'junit:junit:4.12' androidTestImplementation 'androidx.test.ext:junit:1.1.0' androidTestImplementation 'androidx.test.espresso:espresso-core:3.1.1' //ここに追加しましょう! def camerax_version = '1.0.0-alpha06' implementation "androidx.camera:camera-core:${camerax_version}" implementation "androidx.camera:camera-camera2:${camerax_version}" } |
ViewFinderLayoutを実装する
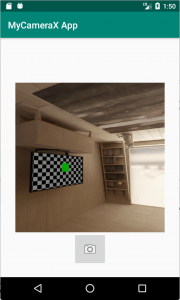
画面のレイアウトは以下のような実装になっています。
| 1 2 3 4 5 6 7 8 9 10 11 12 13 14 15 16 17 18 19 20 21 22 23 24 25 26 27 | <?xml version="1.0" encoding="utf-8"?> <androidx.constraintlayout.widget.ConstraintLayout xmlns:android="http://schemas.android.com/apk/res/android" xmlns:tools="http://schemas.android.com/tools" xmlns:app="http://schemas.android.com/apk/res-auto" android:layout_width="match_parent" android:layout_height="match_parent" tools:context=".MainActivity"> <TextureView android:id="@+id/view_finder" android:layout_width="640px" android:layout_height="640px" app:layout_constraintTop_toTopOf="parent" app:layout_constraintBottom_toBottomOf="parent" app:layout_constraintStart_toStartOf="parent" app:layout_constraintEnd_toEndOf="parent" /> <ImageButton android:id="@+id/capture_button" android:layout_width="72dp" android:layout_height="72dp" android:layout_margin="24dp" app:srcCompat="@android:drawable/ic_menu_camera" app:layout_constraintBottom_toBottomOf="parent" app:layout_constraintEnd_toEndOf="parent" app:layout_constraintStart_toStartOf="parent" /> </androidx.constraintlayout.widget.ConstraintLayout> |
画面はこのようになります。

Camera Permissionのリクエスト
AndroidManifest.xmlに以下の記述を追加します。
| 1 2 | <uses-permission android:name="android.permission.CAMERA" /> <uses-permission android:name="android.permission.WRITE_EXTERNAL_STORAGE" /> |
Android10以降の端末であればWRITE_EXTERNAL_STORAGEの記述は必要ないので、書かなくても良いです。
今回はAndroid9端末で確認した為、記述しています。
カメラ撮影機能を実装する
CameraXのPreviewクラスとImageCaptureクラスを使ってカメラ撮影の機能を実装します。
CameraXのUseCaseクラスが複数ありますが、使用する流れは概ね以下のような感じです。
1.実装したい機能のオプションを設定する
2.リスナーを設定する
3.作成したUseCaseクラスをライフサイクルに紐づける
今回はPreviewクラスとImageCaptureクラスを使います。
Previewクラスの実装
1.SurfaceTextureをつくる
| 1 | viewFinder = findViewById(R.id.view_finder) |
CameraXの実装にはこのSurfaceTextureを使います。
プレビュー画面用に画像を描画する為に作成します。
2.プレビュー時のオプションの設定をする
| 1 2 3 | val previewConfig = PreviewConfig.Builder().apply { setTargetResolution(Size(640, 480)) }.build() |
ここでは、レンズの解像度や画像のアスペクト比などが設定できます。
今回使用している、setTargetResolutionは解像度を設定しています。
Builderクラスにパラメータを設定します。
3.Previewクラスを作成してリスナーを付与する
| 1 2 3 4 5 6 7 | val preview = Preview(previewConfig) preview.setOnPreviewOutputUpdateListener { val parent = viewFinder.parent as ViewGroup parent.removeView(viewFinder) parent.addView(viewFinder, 0) viewFinder.surfaceTexture = it.surfaceTexture } |
出力結果をもとにしてプレビューを更新するにはremoveView()で以前に取得したSurfaceTextureを解放し、addView()で再度追加し直す必要があります。
※ こちらでsetOnPreviewOutoutUpdateListenerの詳細な説明があります。
画面の回転に対する対応
取得できる画像データは画面の回転やアスペクト比が考慮されていないので、画面の回転に対してビューファインダー (TextureView)の回転がずれたり、潰れた状態で表示されることがあります。その為回転に対応した実装を行う必要があります。
| 1 2 3 4 5 6 7 8 9 10 11 12 13 14 15 16 17 | private fun updateTransform() { val matrix = Matrix() //viewFinderの中心を計算します。 val centerX = viewFinder.width / 2f val centerY = viewFinder.height / 2f //カメラの回転を考慮してプレビュー出力を修正します val rotationDegrees = when(viewFinder.display.rotation) { Surface.ROTATION_0 -> 0 Surface.ROTATION_90 -> 90 Surface.ROTATION_180 -> 180 Surface.ROTATION_270 -> 270 else -> return } matrix.postRotate(-rotationDegrees.toFloat(), centerX, centerY) //最後にviewFinderに変換を適用します viewFinder.setTransform(matrix) } |
流れを順番に書くと
1.回転をTextureViewに適用する為のMatrixと回転の中心点を用意する。
2.画面の向きから回転させたい角度を取得してMatrixを更新する。
3.viewFinderにMatrixを適用する。
という感じです。
ImageCaptureクラスの実装
・撮影時のオプションを設定する
カメラの向きを指定する等のカスタマイズをしたい場合は、ImageCaptureConfigを作るときのBuilderクラスにパラメータを設定します。
| 1 2 3 4 | val imageCaptureConfig = ImageCaptureConfig.Builder() .apply { setCaptureMode(ImageCapture.CaptureMode.MIN_LATENCY) }.build() |
今回の場合だと、撮影時低遅延モードに設定しています。
・ImageCaptureクラスを作成し、撮影メソッドを呼ぶ
| 1 2 3 4 5 6 7 8 9 10 11 12 13 14 15 16 17 18 19 | val imageCapture = ImageCapture(imageCaptureConfig) findViewById(R.id.capture_button).setOnClickListener { val file = File(externalMediaDirs.first(), "${System.currentTimeMillis()}.jpg") imageCapture.takePicture(file, executor, object : ImageCapture.OnImageSavedListener { override fun onError( imageCaptureError: ImageCapture.ImageCaptureError, message: String, exc: Throwable? ) { val msg = "Photo capture failed: $message" Log.e("CameraXApp", msg, exc) viewFinder.post { Toast.makeText(baseContext, msg, Toast.LENGTH_SHORT).show() } } |
撮影ボタン押下時にjpgファイルが出力されます。
takePictureメソッドの引数に指定している場所の保存されます。
画像保存が成功した場合Toastを出します。逆に失敗した時はログを出力します。
| 1 | CameraX.bindToLifecycle(this, preview, imageCapture) |
最後にImageCaptureクラスをライフサイクルと紐づけます。
さいごに
CameraXはCameraAPI2と比べると、とても簡単に実装できました。Camera2APIのように凝った設定はできないですが、シンプルなカメラ機能の実装には向いているのではないかと思います。またImageAnalysisクラスも使って画像の解析もできたら楽しそうですね。


viewFinder.surfaceTexture=it.surfaceTexture
において、val cannot reassigned とエラーがでてしまいます。
viewFinder.setSurfaceTexture(it.surfaceTexture)
とすることで解決できました。
参考としたのは下記ページです。
https://stackoverflow.com/questions/63184908/val-cannot-be-reassigned-in-android-buildtool-30-0-1