はじめに
こんにちは。matsunariです。前々からAndroidCameraの実装について気になっていたため、今回はCameraXについて取り扱ってみたいと思います。
CameraXとは
CameraX は、カメラアプリの開発を簡単に行うための Jetpack サポートライブラリです。
Camera2の実装よりもシンプルでコード量も少なく実装する事ができるため、多くのアプリケーションで普及が期待されますね。
Androidでの実装はkotlinで行われる前提ですが、今回はJavaで導入してみようと思います。
CameraXのユースケースは以下の3つとなります。
1.プレビュー:画像表示を行います。
2.画像解析:機械学習などでの利用が想定されます。
3.画像キャプチャ:画像を保存します。
これらを組み合わせたカメラ機能をアプリ内部に実装する事ができます。
また、拡張機能を追加する事でアプリ内に、ポートレート、HDR、夜景、美容などの効果を追加することもできます。
Android Jetpackについて
CameraXはAndroidJetpackの機能の一部です。Android Jetpackは、Androidアプリの開発を加速させる次世代のコンポーネント、ツール、アーキテクチャガイダンスとしてGoogle I/O 2018にて発表されました。優れたAndroidアプリを作成するためのコンポーネントやツール、ガイダンスなどをひとまとまりにしたもので、既存のSupport LibraryとArchitecture ComponentsもJetpackに統合されています。
ひとまとまりとは言っても、それぞれのコンポーネントは、ライブラリとして提供されているので、開発者が使用したいコンポーネントを、自由に選択してアプリに含めることができます。
また、ライブラリとして提供されているため、Androidプラットフォームよりも高頻度で更新され、常に最新のAndroid Jetpackコンポーネントを使用することができます。特定のOSバージョンに左右されずに機能を提供できるため、さまざまなバージョンのプラットフォームでアプリを実行でき、古いOSバージョンをサポートしなければいけない場合も、使用することができます。
※AndroidJetPackの詳細についてはこちらでご確認ください。
Cameraパーミッションの追加
まずは、プレビュー表示のためにAndroidManifestにパーミッションを追加しましょう。
| 1 | <uses-permission android:name="android.permission.CAMERA" /> |
ソースコード全容
今回実装するのはプレビューのみです。
activity_main.xml
| 1 2 3 4 5 6 7 8 9 10 11 12 13 14 15 16 17 18 19 20 21 22 23 24 25 26 27 28 | <?xml version="1.0" encoding="utf-8"?> <androidx.constraintlayout.widget.ConstraintLayout xmlns:android="http://schemas.android.com/apk/res/android" xmlns:app="http://schemas.android.com/apk/res-auto" xmlns:tools="http://schemas.android.com/tools" android:layout_width="match_parent" android:layout_height="match_parent" tools:context=".MainActivity"> <TextureView android:id="@+id/textureView" android:layout_width="323dp" android:layout_height="613dp" app:layout_constraintBottom_toBottomOf="parent" app:layout_constraintEnd_toEndOf="parent" app:layout_constraintStart_toStartOf="parent" app:layout_constraintTop_toTopOf="parent" app:layout_constraintVertical_bias="0.0" /> <Button android:id="@+id/button" android:layout_width="wrap_content" android:layout_height="wrap_content" app:layout_constraintBottom_toBottomOf="parent" app:layout_constraintEnd_toEndOf="parent" app:layout_constraintStart_toStartOf="parent" app:layout_constraintTop_toBottomOf="@+id/textureView" /> </androidx.constraintlayout.widget.ConstraintLayout> |
レイアウトはプレビュー画面表示用のTextureViewと撮影用のボタン(今回は実装なし)を設定しています。
MainActivity.java
| 1 2 3 4 5 6 7 8 9 10 11 12 13 14 15 16 17 18 19 20 21 22 23 24 25 26 27 28 29 30 31 32 33 34 35 36 37 38 39 40 | import android.os.Bundle; import android.util.Rational; import android.util.Size; import android.view.TextureView; import android.view.ViewGroup; import androidx.appcompat.app.AppCompatActivity; import androidx.camera.core.CameraX; import androidx.camera.core.Preview; import androidx.camera.core.PreviewConfig; public class MainActivity extends AppCompatActivity { private TextureView textureView; @Override protected void onCreate(Bundle savedInstanceState) { super.onCreate(savedInstanceState); setContentView(R.layout.activity_main); startCamera(); } private void startCamera() { textureView = findViewById(R.id.textureView); PreviewConfig pConfig = new PreviewConfig.Builder().build(); Preview preview = new Preview(pConfig); preview.setOnPreviewOutputUpdateListener( output -> { ViewGroup parent = (ViewGroup) textureView.getParent(); parent.removeView(textureView); parent.addView(textureView, 0); textureView.setSurfaceTexture(output.getSurfaceTexture()); }); CameraX.bindToLifecycle(this, preview); } |
プレビューの実装
previewインスタンスを利用するために、pconfigを引数として渡し、インスタンス化を行います。
| 1 2 | PreviewConfig config = new PreviewConfig.Builder().build(); Preview preview = new Preview(config); |
setOnPreviewOutputUpdateListenerの中ではSurfaceTextureの更新をして再度親Viewに追加する処理を行います。
| 1 2 3 4 5 6 7 8 9 | preview.setOnPreviewOutputUpdateListener( output -> { ViewGroup parent = (ViewGroup) textureView.getParent(); parent.removeView(textureView); parent.addView(textureView, 0); textureView.setSurfaceTexture(output.getSurfaceTexture()); }); |
最後にbindToLifecycle()でプレビュー表示を行います。
| 1 | CameraX.bindToLifecycle(this, preview); |
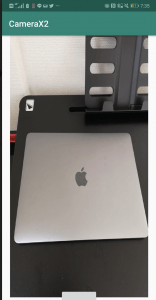
アプリ画面上に動的なカメラプレビューが表示される事が確認できます。

さいごに
CameraXの実装はkotlinで行われている事が多いですがJavaで行いました。Androidの新機能に関してはkotlinで書かれる事が多いと思うので、kotlinを使った実装にも挑戦してみようと思います。今回はプレビューの実装のみだったので次回は画像のキャプチャ等のご紹介しようと思います。


