はじめに
iOS13でUINavigationBarのカスタマイズ方法が変わりましたが、なんだかんだでiOS12を切れず使えていない私の様な方もいると思います。そろそろiOS14が出て、iOS12を切るチャンスが来るのでUINavigationBarのカスタマイズについて書いていきたいと思います。
iOS13から UINavigationBarAppearance という UINavigationBar をカスタマイズする為のクラスが追加されました。
使用方法としては、 UINavigationBarAppearance のインスタンスを作成し navigationItem に設定します。
| 1 2 3 4 5 | let appearance = UINavigationBarAppearance() // 何かしらのカスタマイズ navigationItem.standardAppearance = appearance navigationItem.scrollEdgeAppearance = appearance navigationItem.compactAppearance = appearance |
設定先が3つありますが、以下のタイプに分かれています。
- standardAppearance:通常のナビゲーションバー
- scrollEdgeAppearance:LargeTitle のナビゲーションバー
- compactAppearance:Landscape のナビゲーションバー
それでは主に使用するであろう代表的な使用方法を紹介していきます。
タイトルのカスタマイズ
タイトルのカスタマイズは NSAttributedString.Key の形で記述していきます。以下のサンプルコードではタイトルのテキストカラーとフォントを指定しています。
| 1 2 3 | let appearance = UINavigationBarAppearance() appearance.configureWithOpaqueBackground() appearance.titleTextAttributes = [.foregroundColor: UIColor.blue,.font : UIFont.systemFont(ofSize: 24)] |
LargeTitle の場合は以下のように設定します。
| 1 2 3 | let appearance = UINavigationBarAppearance() appearance.configureWithOpaqueBackground() appearance.largeTitleTextAttributes = [.foregroundColor: UIColor.red] |
背景のカスタマイズ
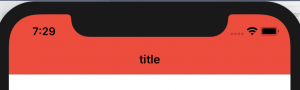
背景のカスタマイズについて、まずは色の変更を行いたいと思います。
| 1 2 3 | let appearance = UINavigationBarAppearance() appearance.configureWithOpaqueBackground() appearance.backgroundColor = UIColor.systemRed |
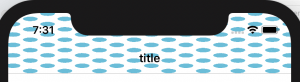
背景には画像も設定できます。
| 1 2 3 4 5 | let appearance = UINavigationBarAppearance() appearance.configureWithOpaqueBackground() appearance.backgroundImage = UIImage(named: "image") // ContentModeも指定できます appearance.backgroundImageContentMode = .scaleToFill |
UIBarButtonItemAppearance
UINavigationBar のカスタマイズをする場合は、ボタンのカスタマイズもしたいですよね。
その場合は UIBarButtonItemAppearance を使用します。
使用方法としては以下の様になります。
| 1 2 3 4 | let buttonAppearance = UIBarButtonItemAppearance() navigationItem.standardAppearance?.buttonAppearance = buttonAppearance navigationItem.standardAppearance?.backButtonAppearance = buttonAppearance navigationItem.standardAppearance?.doneButtonAppearance = buttonAppearance |
UIBarButtonItemAppearance も設定先が3つありますが、以下のタイプに分かれています。
- buttonAppearance:Done ボタン以外の全てのボタン
- backButtonAppearance:backボタンのカスタマイズ、 buttonAppearance に設定されている場合 back ボタンはこちらを優先する
- doneButtonAppearance:Done ボタンのカスタマイズ
ボタンタイトルのカスタマイズ
こちらも NSAttributedString.Key の形で記述していきます。
| 1 2 3 4 5 6 7 8 9 10 | let buttonAppearance = UIBarButtonItemAppearance() buttonAppearance.normal.titleTextAttributes = [.foregroundColor: UIColor.systemGreen] let backButtonAppearance = UIBarButtonItemAppearance() backButtonAppearance.normal.titleTextAttributes = [.foregroundColor: UIColor.systemPink] let doneButtonAppearance = UIBarButtonItemAppearance() doneButtonAppearance.normal.titleTextAttributes = [.foregroundColor: UIColor.systemYellow] navigationItem.standardAppearance?.buttonAppearance = buttonAppearance navigationItem.standardAppearance?.backButtonAppearance = backButtonAppearance navigationItem.standardAppearance?.doneButtonAppearance = doneButtonAppearance |
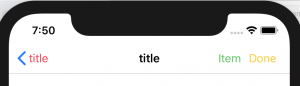
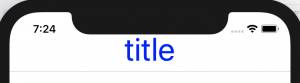
画像を見てもらうと分かりますが、上記のカスタマイズ方法ではシステムで設定されている back ボタンの画像の色は変わりません。( titleTextAttributes なのでそれが正しいとは思いますが)
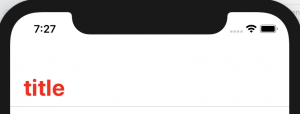
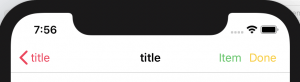
画像の色を変更する場合は、今までの処理と同じく tintColor を設定してください。
| 1 | navigationController?.navigationBar.tintColor = UIColor.systemPink |
おまけ:titleView を使用したカスタマイズ
UINavigationBar のカスタマイズでタイトルをタップしたら何かアクションしたり、そもそもタイトル部分をカスタマイズして機能をもたせたいというのはよくあると思います。
おまけとして今回はタイトル部分に Segment を埋め込む方法を紹介したいと思います。
| 1 2 3 4 5 6 7 8 9 10 11 12 13 14 15 16 17 18 19 20 | override func viewDidLoad() { super.viewDidLoad() let segmentTextContent = [ NSLocalizedString("Image", comment: ""), NSLocalizedString("Text", comment: ""), NSLocalizedString("Video", comment: "") ] let segmentedControl = UISegmentedControl(items: segmentTextContent) segmentedControl.selectedSegmentIndex = 0 segmentedControl.autoresizingMask = .flexibleWidth segmentedControl.frame = CGRect(x: 0, y: 0, width: 400, height: 30) segmentedControl.addTarget(self, action: #selector(action(_:)), for: .valueChanged) self.navigationItem.titleView = segmentedControl } @IBAction func action(_ sender: AnyObject) { Swift.debugPrint("CustomTitleViewController IBAction invoked") } |
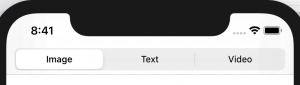
この様に UINavigationBar に Segment を埋め込むことができました。
さいごに
UINavigationBar のカスタマイズについてカラーやフォントが設定しやすくなったり、画面ごとに設定を変更したい場合など、かなり使いやすくなった印象です。iOS12を脱却してこれ一つにまとめたい所ですね。
おすすめ書籍
![[改訂新版]Swift実践入門 ── 直感的な文法と安全性を兼ね備えた言語 WEB+DB PRESS plus](https://images-fe.ssl-images-amazon.com/images/I/51iVtfFPV1L._SL160_.jpg)

![[改訂新版]Swiftポケットリファレンス (POCKET REFERENCE)](https://images-fe.ssl-images-amazon.com/images/I/51L6-N7qRyL._SL160_.jpg)