はじめに
今回はアプリ側のデータをWidgetKitにて表示を行うために、App Groupsを使用してデータの共有を行いたいと思います。
App Groupsとは簡単にいうと、同一デベロッパーが開発したアプリであれば、共有領域にデータを保存することによって、複数のアプリ間でデータの読み書きが行える機能になります。
App Groupsの準備
WidgetKitの準備はこちらの記事をご確認ください。今回はこの記事で作成したWidgetに追加する形でサンプルを記載しています。
App Groupsの許可
まずはホストのアプリのTARGETにある、Signing & CapabilitiesタブでApp Groupsを追加してください。そうすると以下の項目が追加されます。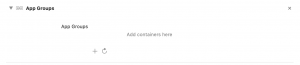
+ボタンを押下し、グループ名を入力します。今回のサンプルでは「group.com.example.WidgetSample」とします。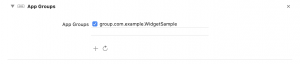
そうしたならばWidgetKitのSigning & CapabilitiesタブからApp Groupsを追加します。そうすると先ほど追加したグループが表示されるのでチェックを入れて有効化してください。
App Groupsの使い方
App Groupsの使い方は簡単でUserDefaultsに先ほど指定したIDを使用することで、共有領域にデータを保存することができます。
| 1 2 | UserDefaults(suiteName: "group.com.example.WidgetSample")? .setValue(count, forKey: "CountRecordKey") |
WidgetKitにデータ共有
これで準備は完了したので、早速WidgetKitにデータを共有して表示を行いたいと思います。
まずはアプリ側でデータの保存とWidgetKitの更新を行います。
| 1 2 3 4 5 | func reloadCount(count: Int) { UserDefaults(suiteName: "group.com.example.WidgetSample")? .setValue(count, forKey: "CountRecordKey") WidgetCenter.shared.reloadAllTimelines() } |
WidgetKit側にUtilitiesというstructを作成し、データ取得用のメソッドを追加します。
| 1 2 3 4 5 6 7 8 | struct Utilities { static let group = UserDefaults(suiteName: "group.com.example.WidgetSample") static func countOfRecord() -> Int { let count = Utilities.group?.integer(forKey: "CountRecordKey") ?? 0 return count } } |
TimelineEntryに今回表示するようのcountを追加します。
| 1 2 3 4 5 6 | struct SimpleEntry: TimelineEntry { let date: Date var name: String var count:Int } |
entryを作成する際にデータ取得用のメソッドを呼びます。
| 1 2 3 | let entry = SimpleEntry(date: entryDate, name: configuration.Name ?? "", count: Utilities.countOfRecord()) |
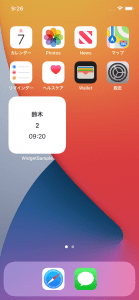
追加したcountを表示するようにします。
| 1 2 3 4 5 6 7 8 9 10 11 12 13 | struct WidgetTest1EntryView : View { var entry: Provider.Entry var body: some View { Text(entry.name) .font(.headline) .padding(1) Text("\(entry.count)") .font(.headline) .padding(1) Text(entry.date, style: .time) } } |
今回追加したコードを含めたWidgetKitのコード全文になります。
| 1 2 3 4 5 6 7 8 9 10 11 12 13 14 15 16 17 18 19 20 21 22 23 24 25 26 27 28 29 30 31 32 33 34 35 36 37 38 39 40 41 42 43 44 45 46 47 48 49 50 51 52 53 54 55 56 57 58 59 60 61 62 63 64 65 66 67 68 69 70 71 72 73 74 75 76 77 78 79 80 81 82 | import WidgetKit import SwiftUI import Intents struct Provider: IntentTimelineProvider { typealias Intent = ConfigurationIntent func placeholder(in context: Context) -> SimpleEntry { SimpleEntry(date: Date(), name: "", count: 0) } func getSnapshot(for configuration: ConfigurationIntent, in context: Context, completion: @escaping (SimpleEntry) -> ()) { let entry = SimpleEntry(date: Date(), name: "", count: 0) completion(entry) } func getTimeline(for configuration: ConfigurationIntent, in context: Context, completion: @escaping (Timeline<Entry>) -> ()) { var entries: [SimpleEntry] = [] // Generate a timeline consisting of five entries an hour apart, starting from the current date. let currentDate = Date() for hourOffset in 0 ..< 5 { let entryDate = Calendar.current.date(byAdding: .hour, value: hourOffset, to: currentDate)! let entry = SimpleEntry(date: entryDate, name: configuration.Name ?? "", count: Utilities.countOfRecord()) entries.append(entry) } let timeline = Timeline(entries: entries, policy: .atEnd) completion(timeline) } } struct SimpleEntry: TimelineEntry { let date: Date var name: String var count:Int } struct WidgetTest1EntryView : View { var entry: Provider.Entry var body: some View { Text(entry.name) .font(.headline) .padding(1) Text("\(entry.count)") .font(.headline) .padding(1) Text(entry.date, style: .time) } } @main struct WidgetTest1: Widget { let kind: String = "WidgetTest1" var body: some WidgetConfiguration { IntentConfiguration(kind: kind, intent: ConfigurationIntent.self, provider: Provider()) { entry in WidgetTest1EntryView(entry: entry) } .configurationDisplayName("My Widget") .description("This is an example widget.") } } struct WidgetTest1_Previews: PreviewProvider { static var previews: some View { WidgetTest1EntryView(entry: SimpleEntry(date: Date(), name: "鈴木", count: 0)) .previewContext(WidgetPreviewContext(family: .systemSmall)) } } struct Utilities { static let group = UserDefaults(suiteName: "group.com.example.WidgetSample") static func countOfRecord() -> Int { let count = Utilities.group?.integer(forKey: "CountRecordKey") ?? 0 return count } } |
さいごに
アプリのデータをWodgetに表示するのはマストだと思いますので、この記事が誰かの役に立てば幸いです。
おすすめ書籍
![[改訂新版]Swift実践入門 ── 直感的な文法と安全性を兼ね備えた言語 WEB+DB PRESS plus](https://images-fe.ssl-images-amazon.com/images/I/51iVtfFPV1L._SL160_.jpg)

![[改訂新版]Swiftポケットリファレンス (POCKET REFERENCE)](https://images-fe.ssl-images-amazon.com/images/I/51L6-N7qRyL._SL160_.jpg)